
Functional Magnetic Material Binder Jet Printer

Overview
For my Senior Design Project, I worked with a team of peers to complete a Binder Jet 3D Printer that is capable of producing metal parts with functional magnetic properties. This project was sponsored by Dr. Markus Chmielus of Pitt’s AM3 Materials Lab, who desired a prototype printer to confirm their theories on the properties of functional magnetic 3D printed components.
Concept
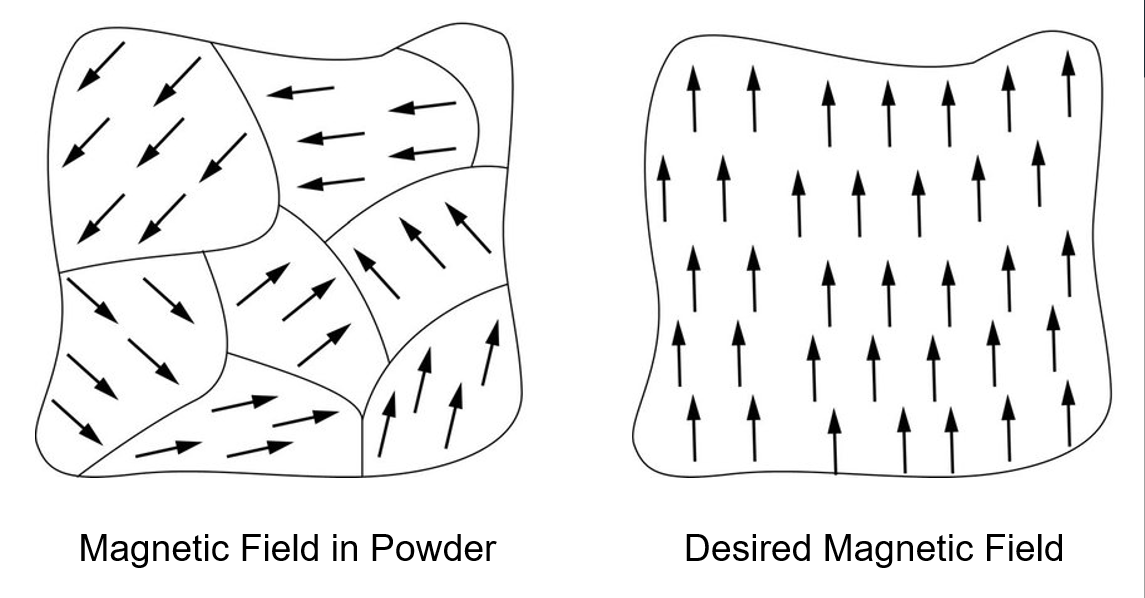
The goal of the printer is to build complex parts with arbitrary geometry which can react physically in the presence of a magnetic field. The core principle permitting this is the alignment of the magnetic fields of the metal powder particles that comprise a binder jet printed part. By aligning the magnetic domains of the individual metallic powder grains using an electromagnet during the 3D printing process, the resulting cohesive magnetic structure mimics that of a single ferromagnetic grain and therefore will strain when in the presence of a strong magnetic field.
Applications
Functional magnetic components have a wide variety of potential uses in fields including biomedicine and electronics. Their complex geometry, small scale, and ability to strain without the need for physical contact give them the ability to be placed in small, hard-to-reach environments and carry out a mechanical action.
For example, in combination with other technologies such as compliant mechanisms, functional magnetic parts could allow for small single-piece switches that actuate in the presence of a magnetic field, which could be used in implanted biomedical products.

Image credit: compliantmechanisms.byu.edu
Development
This project was carried over from several previous semesters, so there was a lot of valuable work that had been completed by prior students. Some components of the printer, such as the overall mechanical structure were satisfactory but other elements such as the circuitry and firmware needed redesigning. Our team prioritized improvements we wanted to make to the existing printer as well as new items requiring ground-up development.
I worked primarily on the hardware of the system, in developing and fabricating circuitry for the electromagnet (solenoid) and heat lamp to be controlled by the Arduino, while also improving some of the printer’s mechanical tolerances. Since the solenoid aligns the metal particles’ magnetic fields, controlling the intensity of the magnetic field is a critical performance requirement. If the field is too weak, the printed component will not have bulk magnetic properties. If too strong, the particles will physically stack on the magnetic field lines, ruining the geometry of the part being printed. Therefore, I designed a control circuit that would allow for precise software control of the field intensity by varying the gate voltage of a MOSFET to vary the resistance of the solenoid circuit. The heat lamp is used to cure the adhesive binder for each layer of the print, requiring only a MOSFET to switch its power on and off.
Circuitry
The previous groups used two microcontrollers for the printer, a Teensy and an Arduino MEGA. We determined that the use of two microcontrollers was redundant and increased complexity by having different logic voltages (3.3V and 5V, respectively). We decided instead to use a single Arduino, which required a new circuit board to connect the printer’s stepper motor drivers that previously were wired to the Teensy. I developed this board layout using the free KiCAD PCB software package. Additionally, I designed an op-amp feedback control circuit for the solenoid, such that a low-pass filtered PWM signal from the Arduino could be compared to the current flow (and therefore magnetic field intensity) in the coil and adjust the supplied MOSFET gate voltage accordingly.
The circuit board was hand-assembled on protoboard, including sockets for daughterboards and op-amps, JST connectors, and a standard ATX computer power supply. These features were chosen to simplify the maintenance of the printer.


Lessons Learned
Our team was successful in developing flexible class-based firmware for the printer, which when combined with the electrical improvements allowed for the printer to successfully demonstrate its capabilities, from reading a sliced CAD model from an SD card, to loading the file through an onboard graphical user interface, and printing the component with the solenoid and heat lamp control. Unfortunately, the InkShield hat for the Arduino which controlled the inkjet cartridge failed shortly into testing, resulting in the inability to disperse binder and therefore the inability to print further parts. This failure highlighted the importance of having spare components in a prototype test environment. Our team had prepared for such unexpected failures by sourcing spare stepper motor drivers, but we did not have a replacement InkShield on hand.
Prior to this project, I had minimal experience using KiCAD or fabricating circuit boards, and learned late in the project that cost-effective custom printed circuit boards can be purchased from a variety of companies. Such a board would have significantly reduced the electrical fabrication time as hand soldering traces took far longer than a custom PCB could have been etched directly from the KiCAD drawings. Additional research in the early stages of the project could have saved time later by making our team aware of other fabrication options.
This project also instilled the importance of documentation for large projects, as many design features from previous teams that we ran in to had little to no documentation or analysis. We therefore prioritized documenting the steps we took, through photos, comprehensive CAD models, wiring diagrams, and summary documents such that future teams would have a more solid groundwork on which to build their contributions to the printer.
Ultimately, our team drastically advanced the binder jet printer, as the machine now not only can print parts from CAD models, but now also features a flexible and well-documented firmware, which will allow researchers or future design teams to parametrically modify the printer’s functions.